
Introduction
If you have ever wondered how competition-winning scale models achieve such impossibly fine detail — razor-thin railings on a 1/700 destroyer, perfectly textured cockpit side-panels on a 1/48 fighter, or delicate mesh grilles on a 1/35 tank — the answer is almost always photo-etch (PE). These precision brass parts are the single most popular aftermarket upgrade category in scale modeling, and for good reason: they add a level of realism that injection-molded plastic simply cannot match.
In this guide we will walk you through everything a beginner needs to know about photo-etch detail sets — what they are, how they are made, what tools you need, and practical tips to get you started on your first PE project.
What is Photo-Etching?
Photo-etching is a precision chemical manufacturing process used to create flat metal parts with extremely fine detail. Here is how it works in simplified form:
- Design: An engineer creates the part layout as a vector file at actual size, placing dozens (sometimes hundreds) of individual parts on a single sheet.
- UV Exposure: A thin brass sheet (typically 0.10 mm to 0.25 mm thick) is coated with a light-sensitive resist and exposed through the design mask using ultraviolet light.
- Acid Bath: The sheet is immersed in an etching solution that dissolves the unprotected metal, leaving only the desired shapes behind.
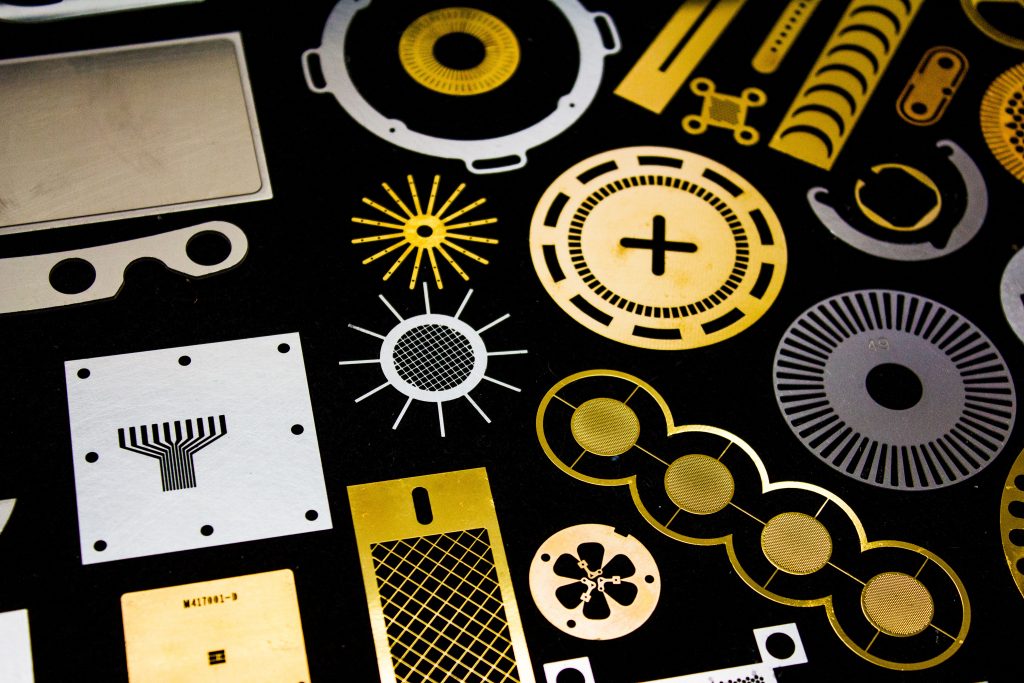
- Finishing: Half-etch fold lines are scored (not cut through) to guide precise bending, and the finished sheet — called a fret — is cleaned and packaged with an instruction diagram.
The result is a brass fret containing dozens of parts with detail as fine as 0.1 mm — far beyond what injection molding can achieve at hobby scales. At 1/72 scale, that 0.1 mm translates to roughly 7 mm in real life, meaning PE can replicate sheet metal, woven mesh, thin brackets, and even text placards that would be impossible in plastic.
Why Use Photo-Etch Sets?
Injection-molded plastic has a physical limitation: at hobby scales, the thinnest wall a steel mold can reliably produce is about 0.3 to 0.5 mm. That may not sound like much, but at 1/72 scale a 0.5 mm plastic railing represents a real-world beam over 35 mm (1.4 inches) thick — far too chunky for a scale warship. Photo-etch eliminates this problem entirely.
Here are the most common applications by subject category:
- Aircraft: Cockpit instrument panels, seat harnesses, airbrake interiors, flap hinge details, and landing gear doors. Browse aircraft photo-etch sets.
- Armor: Fender mud flaps, engine mesh screens, tool clamps, turret basket railings, and pioneer-tool brackets. Browse armor photo-etch sets.
- Ships: Railings, vertical ladders, radar arrays, signal flags, crane booms, and catapult structures. Browse ship photo-etch sets.
In every case the PE replacement is dramatically thinner, more precise, and more realistic than its plastic equivalent.
What Comes in a Photo-Etch Set?
A typical photo-etch set includes one or more brass frets (the metal sheets containing all the parts) and a printed instruction sheet showing where each part goes on the kit. Most sets are kit-specific — they are designed to fit an exact plastic kit from a specific manufacturer and scale. For example, you will find sets labeled "for Tamiya 1/48 F-16C" or "for Zvezda 1/350 Bismarck."
Major kit manufacturers supported by aftermarket PE producers include Tamiya, Zvezda, Trumpeter, Hasegawa, and Revell — among many others.
Essential Tools for Working with Photo-Etch
You do not need a huge investment to start working with PE, but a few tools are essential:
- Sharp Hobby Knife (#11 blade): For separating parts from the fret. Score and snap rather than cutting straight through — this prevents distortion.
- Fine-Point Tweezers: PE parts are tiny. Good tweezers with a pointed tip are indispensable for placement.
- PE Bending Tool: This is the single most important tool. A dedicated bending tool (like the Trumpeter or RP Toolz bender) lets you create precise, repeatable 90-degree and custom-angle folds along the half-etch lines.
- CA (Super) Glue: Standard plastic cement does not bond metal. Use medium-viscosity CA glue for most PE work. A fine applicator tip helps control the tiny amounts needed.
- Sanding Stick (fine grit): For removing any small nubs left after separating parts from the fret.
Explore our modeling tools collection for bending tools, tweezers, and accessories.
Start Simple
For your first PE project, choose a set with mostly flat parts — instrument panels, wing walkway strips, or hull portholes. These require cutting and gluing but minimal bending. Save complex 3D assemblies (like radar arrays or cockpit tubs) for later projects once you are comfortable with the material.
Work on a Cutting Mat
PE parts are tiny, shiny, and love to fly off the bench when cut free from the fret. Always work on a self-healing cutting mat with a light-colored surface. Some modelers place a piece of tape sticky-side-up near their work area to catch escapees. If a part does launch into the air, check your clothes first — the brass is slightly magnetic to fabric fibers.
Anneal Before Bending
Raw brass can be springy. If a part resists bending or tries to spring back, anneal it first: hold the piece with tweezers and pass it through a candle flame for two to three seconds, then let it cool. The heat softens the metal grain structure, making it pliable and easy to fold cleanly along half-etch lines. Do not overheat — the part should turn a straw color, not glow red.
Prime Before Painting
Bare brass is smooth and non-porous, so paint will bead off or chip easily without a primer coat. After all bending and gluing is done, apply a thin coat of primer (gray or black, depending on your scheme) before painting. Metal primers or self-etching primers give the best adhesion.
Dry-Fit Everything
CA glue bonds instantly and permanently — there is no repositioning window. Before applying any adhesive, dry-fit the PE part onto the model to confirm alignment, orientation, and fit. Use a drop of white glue (PVA) first if you want a temporary hold to test placement; it can be soaked off with water if needed.
Photo-Etch Manufacturers
Microdesign is one of the top photo-etch manufacturers in the world, known for exceptional design precision, clear instructions, and an enormous catalog spanning aircraft, armor, ships, and civil subjects. iModeller carries one of the widest selections of Microdesign products available in North America.
Beyond Microdesign, the aftermarket world includes brands like Eduard, Voyager Model, Flyhawk, and Pontos — each with their own specialty areas. You can browse our full photo-etch catalog to explore sets by kit manufacturer, scale, or subject type.
Ready to Try Photo-Etch?
Whether you are building your first 1/72 aircraft or detailing a museum-quality 1/350 battleship, photo-etch parts will transform your models. Start with a simple kit-specific set, invest in a good bending tool, and practice on a few flat parts before tackling complex assemblies. The learning curve is short, and the results are immediately visible.
Browse our complete photo-etched detail sets collection and find the perfect upgrade for your next build.
Leave a comment
This site is protected by hCaptcha and the hCaptcha Privacy Policy and Terms of Service apply.